Install Python with uv, VS Code and Jupyter
Learning how to install Python is only the first step towards managing a project effectively. You also need to isolate its libraries in a virtual environment, manage their versions and be able to recreate that environment on another computer. Several tools address these needs in different ways: pip, venv, Conda, Poetry and Pipenv.
uv, developed by Astral in Rust, brings these tasks together in one tool: installing Python versions, initializing a project, creating its virtual environment and managing its dependencies. This lets us follow the same workflow throughout the tutorial.
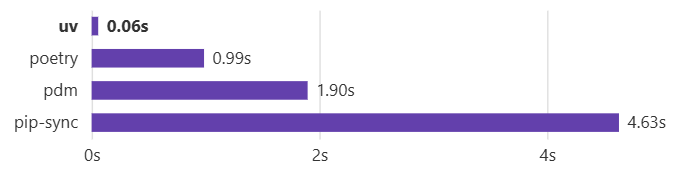
Figure 1 also illustrates its speed in a specific case: installing Trio’s dependencies, compared with Poetry, PDM and pip-sync. The test uses a warm cache, meaning packages already stored on the computer from a previous installation.
In this tutorial, we will use uv to set up the project at D:\ML-projects\projet-ia, install its libraries and configure VS Code and Jupyter. You will then create TesterProjet.ipynb to check the kernel’s Python interpreter and the library versions. Reading data will be covered in the next lesson.
Contents
1. Understand the tools and why we use uv
These tools have distinct roles. Python is the language; its interpreter is the program that executes the code. A library provides reusable code: pandas, for example, lets you read and work with tables. A library that a project requires is one of its dependencies.
VS Code is the editor where you organize files and write code. A Jupyter notebook is an .ipynb document containing text and code cells, along with their outputs. The kernel is the process that executes those cells and keeps variables in memory. The Jupyter extension for VS Code provides the interface; ipykernel, installed in the selected Python environment, enables Python cells to run. See Microsoft’s kernel documentation.
Why create a virtual environment?
A virtual environment is a folder containing a Python executable for a particular project and its libraries, isolated by default from those in other installations. In this guide, the folder is named .venv. The Python documentation on virtual environments explains this isolation: several projects can use different versions of the same library. You can keep Anaconda or another Python installation. For this project, the notebook’s kernel must use the Python interpreter in its .venv.
The environment stores files; the kernel runs code
On disk — persistent files
These files remain when VS Code is closed.
Project environment: projet-ia/.venv
Local Python interpreter
Scripts\python.exe
Installed libraries
Lib\site-packages
pandas · openpyxl · ipykernel
Notebook file: TesterProjet.ipynb, saved in the project folder outside .venv.
The selected local Python starts the kernel. The kernel can import the libraries installed in this environment.
In memory — while the kernel is running
Notebook in VS Code
Sends cell code and displays the returned outputs.
Python kernel
Executes the code and keeps variables in memory.
.venv stores Python and its libraries on disk. The kernel runs in memory and uses this interpreter to execute cells and return their outputs. sys.executable lets you check the executable’s path.Figure 2 distinguishes two levels. On disk, .venv stores the executable and installed packages. On Windows, their paths are .venv\Scripts\python.exe and .venv\Lib\site-packages. On macOS or Linux, the executable is usually .venv/bin/python. In memory, VS Code displays the notebook and sends its code to the kernel, which executes the cells, imports libraries from its environment and returns the results.
Creating .venv and installing libraries in it is therefore not enough: the kernel must also start with that environment’s Python interpreter. The folder remains when the kernel stops, but the process’s variables are lost. The .ipynb file stores the cells and saved outputs; reopening an earlier output does not recreate the variables that produced it.
uv is a Python and Python project management tool developed by Astral. We use it to install Python, create the project, add its dependencies and run code in its .venv. These features are described in the uv documentation.
Learn more: compare uv, pip, conda and Poetry
| Tool | Role and benefits |
|---|---|
| pip | Installs Python packages in an environment. The traditional workflow combines it with venv and dependency files. |
| conda | Manages environments and Python or non-Python packages from distribution channels. |
| Poetry | Manages dependencies, environments, a lockfile and Python package builds. |
| uv | Combines Python, environment, dependency and execution management. Uses a shared cache and uv.lock. |
pip installs packages into a specific Python environment; conda manages environments and Python or non-Python packages; Poetry organizes dependencies and the distribution of Python projects. Here, choosing uv lets us follow one workflow. See the pip workflows, conda environment management and Poetry’s getting-started guide.
2. Install Python with uv on Windows
Open PowerShell from the Start menu. A terminal is an interface where you enter commands; PowerShell is the program that interprets them here. Later, we will use the PowerShell terminal integrated into VS Code.
Check for uv or install it
First, check whether it is already available:
# Check the uv version
PS C:\WINDOWS\system32> uv --version
uv 0.12.23
If a version number appears, move on to the Python installation below. The output shown is shortened: uv may also display build information. If Windows reports that uv is not recognized, use the Windows command from Astral’s official installer:
# Install uv using the official script
PS C:\WINDOWS\system32> powershell -ExecutionPolicy ByPass -c "irm https://astral.sh/uv/install.ps1 | iex"
This command downloads and runs the installer from Astral’s domain. The ByPass option allows the script to run in the PowerShell process launched by this command. It does not permanently change the system’s execution policy; a Group Policy setting may still take precedence. See PowerShell execution policies.
After installation, close and reopen PowerShell, then run uv --version again so the terminal can find the new executable. On my computer, uv was already installed, so reinstalling it was unnecessary.
Install the project’s Python version
# Install Python 3.14 with uv
PS C:\WINDOWS\system32> uv python install 3.14
Python 3.14 is already installed
We use Python version 3.14, which is compatible with the libraries used in this lesson. The output above indicates that this version was already installed. On a new computer, uv will download it. uv can install and locate Python without a prior manual installation from python.org.
Where does uv install Python?
By default, uv python install 3.14 installs CPython, the reference implementation of the Python language, as defined in the Python glossary. uv keeps this installation in its Python version directory, outside the project. With uv 0.12.23 on our computer, that directory is C:\Users\Nitro\AppData\Roaming\uv\python. In this path, Nitro is the Windows account name used in the screenshots. To find CPython’s location on your computer, run:
# Show the directory for Python installations managed by uv
PS C:\WINDOWS\system32> uv python dir
C:\Users\Nitro\AppData\Roaming\uv\python
This CPython installation can serve as the base for several projects. In the next step, we will create this lesson’s virtual environment at D:\ML-projects\projet-ia\.venv. The project’s libraries will be installed in this .venv, whose Python interpreter will then be selected for the kernel in VS Code.
3. Create the project and its .venv
A project brings together its code, data and settings. In Windows File Explorer, create the parent folder D:\ML-projects if it does not exist, then navigate to it in PowerShell. This is the location used in the screenshots: adapt the path to your computer. In the following blocks, enter only the commands.
# Move to the projects directory
PS C:\WINDOWS\system32> Set-Location -LiteralPath "D:\ML-projects"
Initialize the project from this parent folder:
# Create the Python application project
PS D:\ML-projects> uv init --app --no-package --vcs none projet-ia --python 3.14
Initialized project `projet-ia` at `D:\ML-projects\projet-ia`
uv init creates the project files. --app --no-package sets up a simple application without a distributable package structure; --vcs none avoids creating a Git repository at this stage; --python 3.14 selects the Python version. Then enter projet-ia and display its contents with ls, the PowerShell alias for Get-ChildItem.
# Enter the project directory
PS D:\ML-projects> cd projet-ia# List the directory contents
PS D:\ML-projects\projet-ia> ls
Répertoire : D:\ML-projects\projet-ia
Mode LastWriteTime Length Name
---- ------------- ------ ----
-a---- 10/10/2026 08:34 5 .python-version
-a---- 10/10/2026 08:34 87 main.py
-a---- 10/10/2026 08:34 155 pyproject.toml
-a---- 10/10/2026 08:34 0 README.mdThis output shows the four files created by uv init.
Create the virtual environment with uv
From projet-ia, explicitly create .venv with a Python interpreter from the 3.14 series:
# Create the .venv environment with Python 3.14
PS D:\ML-projects\projet-ia> uv venv --python 3.14
Using CPython 3.14.8
Creating virtual environment at: .venv
Activate with: .venv\Scripts\activate
In the screenshot, uv uses CPython 3.14.8 and creates D:\ML-projects\projet-ia\.venv. The Activate with: line shows an activation option; activation is not required for uv project commands. See the uv venv documentation. Run the script created during initialization:
# Run main.py in the project environment
PS D:\ML-projects\projet-ia> uv run main.py
Hello from projet-ia!
The message Hello from projet-ia! confirms that the program runs. uv run uses the Python interpreter in .venv without manual activation. All subsequent uv add, uv run and uv sync commands must be run from projet-ia, where pyproject.toml is located. The PowerShell outputs reproduced in this guide match the screenshots of this installation; processing times vary between computers.
4. Add libraries and understand the files
We are setting up pandas to work with tables and openpyxl to read Excel .xlsx workbooks in the next lesson. ipykernel will let us run Python notebook cells right away.
In PowerShell, from projet-ia, run:
# Add pandas and openpyxl for working with Excel
PS D:\ML-projects\projet-ia> uv add pandas openpyxl
Resolved 8 packages in 390ms
Installed 7 packages in 1.95s
 + et-xmlfile==2.0.0
 + numpy==2.5.3
 + openpyxl==3.1.5
 + pandas==3.0.6
 + python-dateutil==2.9.0.post0
 + six==1.17.0
 + tzdata==2026.5
Then add the kernel to the development tools group:
# Add ipykernel as a development dependency
PS D:\ML-projects\projet-ia> uv add --dev ipykernel
Resolved 39 packages in 730ms
Installed 26 packages in 7.30s
 + asttokens==3.0.2
 + colorama==0.4.6
 + comm==0.2.3
 + debugpy==1.8.22
 + executing==2.2.1
 + ipykernel==7.4.0
 + ipython==9.17.1
 + ipython-pygments-lexers==1.1.1
 + jedi==0.20.0
 + jupyter-client==8.10.0
 + jupyter-core==5.9.1
 + matplotlib-inline==0.2.2
 + nest-asyncio2==1.7.4
 + packaging==26.3
 + parso==0.8.7
 + platformdirs==4.12.4
 + prompt-toolkit==3.0.53
 + psutil==7.2.2
 + pure-eval==0.2.4
 + pygments==2.21.0
 + pyzmq==27.2.0
 + stack-data==0.6.3
 + tornado==6.5.10
 + traitlets==5.16.1
 + typing-extensions==4.16.0
 + wcwidth==0.9.2
The additional packages are indirect dependencies: the libraries you requested depend on them. You do not need to enter their names. --dev places ipykernel in the dev group, which uv synchronizes by default. For a local Python kernel in VS Code, the Jupyter extension and ipykernel are enough; the full jupyter Python package is not required. This setup follows Astral’s procedure for VS Code. Plotting and machine learning libraries will be added when they are needed.
pyproject.toml, uv.lock and .venv
After uv add pandas openpyxl, the dependencies appear in two files and one folder. Each has a specific role: declaring the project’s requirements, recording the selected versions and installing the packages. Figure 3 follows pandas through these three stages.
-
Declare
pyproject.tomlpandas>=3.0.6The project requires pandas 3.0.6 or a compatible later version. -
Lock
uv.lockpandas : 3.0.6 uv records the exact version selected and the versions of its indirect dependencies. -
Install
.venvPython + pandas 3.0.6 The virtual environment contains Python and the packages ready to use on this computer.
In pyproject.toml, pandas>=3.0.6 is a version constraint: it allows pandas 3.0.6 or a later version, provided the project’s other requirements are met. This file expresses the project’s requirements.
uv then performs dependency resolution: it selects a compatible set of versions, also taking into account libraries required by pandas, such as NumPy. Locking records these exact choices in uv.lock. In this project, pandas is locked to version 3.0.6. These roles are explained in the documentation on uv project structure.
Finally, synchronization installs the required packages in .venv, the project’s local virtual environment. By default, uv add performs all three operations: it adds dependencies to pyproject.toml, updates uv.lock and synchronizes .venv. The .python-version file, separate from these three elements, identifies the selected Python version.
The uv add commands have populated pyproject.toml. Here is its content in the screenshot:
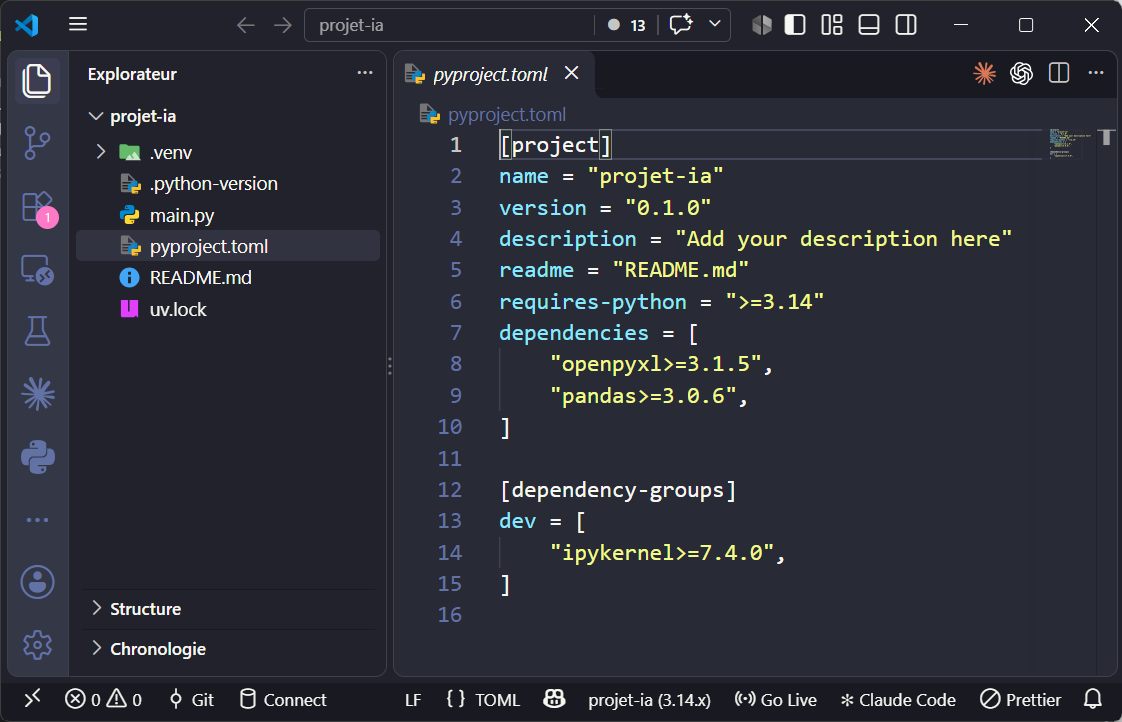
pandas and openpyxl are project dependencies; ipykernel belongs to the dev group.In the following screenshot of uv.lock, you can find the exact pandas version: 3.0.6. In step 5, you will open the project folder to find these files in the Explorer.
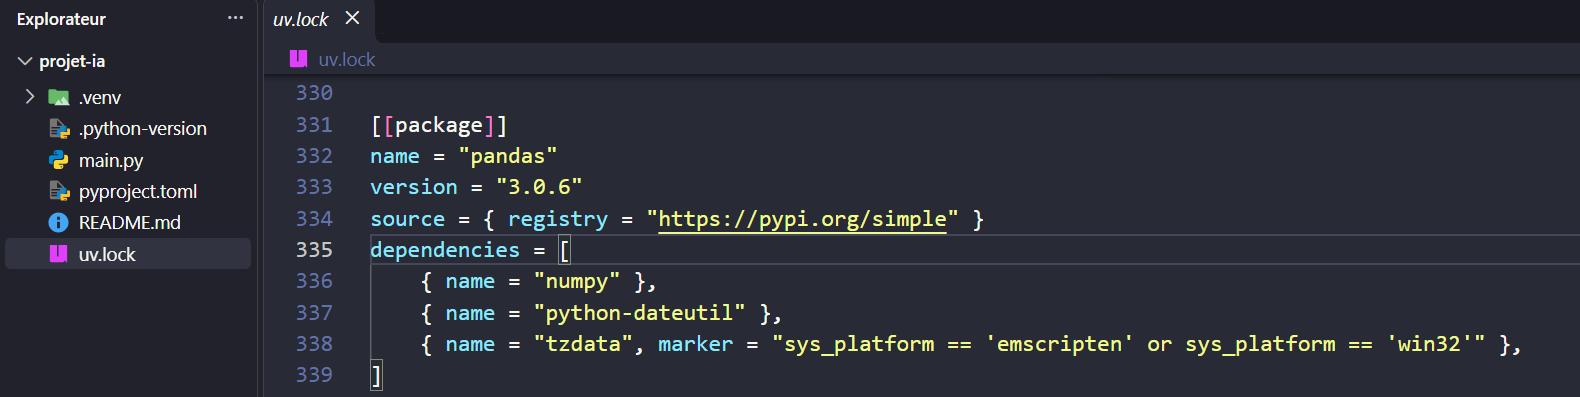
pandas entry records version 3.0.6, its source and its dependencies.Keep and share pyproject.toml and uv.lock with your code. The .venv folder is specific to your computer: uv can recreate it from these files. To install the locked dependencies or check that the environment matches them, without changing the lockfile, use:
# Synchronize the environment using uv.lock
PS D:\ML-projects\projet-ia> uv sync --locked
Resolved 39 packages in 40ms
Checked 33 packages in 8ms
In the screenshot, the packages are already installed, so uv checks the environment. --locked raises an error if the lockfile needs to be updated to match the project. Locking makes dependencies easier to reproduce, without guaranteeing identical results on every computer and operating system. See locking and synchronization.
5. Open the project in VS Code
The project and its libraries are ready. We will now open this folder in VS Code to create the notebook and choose its kernel. If VS Code is not installed yet, download the Windows installer from the official website, run it and open the application. The Microsoft documentation explains the installation options. If VS Code is already installed, go straight to opening the folder.
Open the right folder
In PowerShell, from D:\ML-projects\projet-ia, run the command shown in the screenshot:
# Open the project directory in VS Code
PS D:\ML-projects\projet-ia> code .
The dot . represents the current folder. This command opens projet-ia in VS Code. If code is not recognized, open VS Code, choose File → Open Folder and select your projet-ia folder. The Explorer should show .venv, pyproject.toml and uv.lock at the top level.
Install the Python and Jupyter extensions
Open the Extensions panel with Ctrl+Shift+X. Search for ms-python.python and install Microsoft’s Python extension if it is missing. It provides Python support in the editor, including interpreter selection.

Then search for ms-toolsai.jupyter and install Microsoft’s Jupyter extension. It lets you open .ipynb files, choose a kernel and execute cells.

The Terminal → New Terminal menu opens an integrated terminal. Choose the PowerShell profile and check that its current folder is projet-ia.
6. Create TesterProjet.ipynb and check the kernel
Create TesterProjet.ipynb in the project
The project is open in VS Code and both extensions are installed. Now create your notebook: open the Command Palette with Ctrl+Shift+P, run Create: New Jupyter Notebook (or simply create a file with the .ipynb extension), then save it with Ctrl+S using the exact name TesterProjet.ipynb, directly in projet-ia, alongside pyproject.toml.
The + Code button adds an executable cell; + Markdown adds text. In the first Code cell, enter:
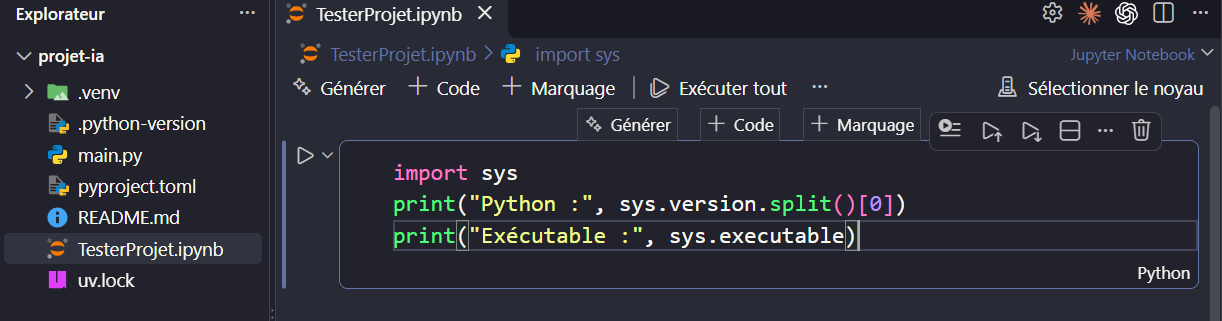
Select the project’s .venv
- At the top right, click Select Kernel.
- If only recently used kernels appear, choose Select Another Kernel, then Python Environments.
- Choose the projet-ia environment associated with
.venv\Scripts\python.exe. In the screenshot, it appears as projet-ia (3.14.x) (Python 3.14). - Check that this path belongs to your project folder. A global Python installation or the Conda
baseenvironment does not provide access to the packages in this.venv.
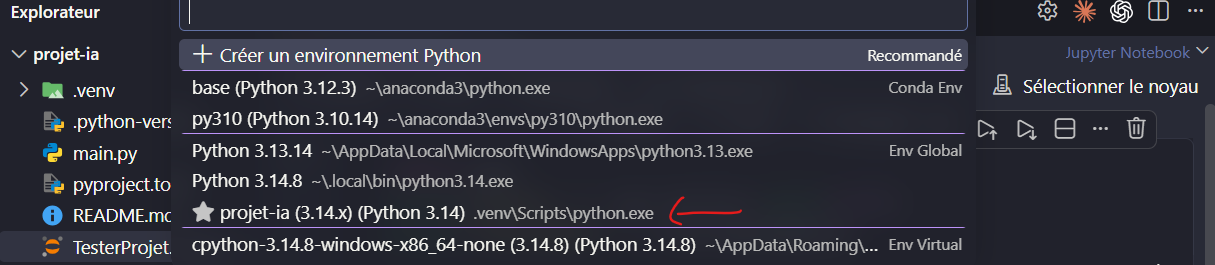
projet-ia entry shows .venv\Scripts\python.exe: this is the environment set up with uv.Selecting an interpreter through Python: Select Interpreter configures the editor’s Python features. Also check the notebook’s kernel: it must start the Python interpreter in .venv. Labels vary with the language and version of VS Code; the executable’s path remains the decisive check. See kernel management in VS Code.
Run the cell and check Python
Click the triangle to the left of the cell, or use Ctrl+Enter. The output appears below the cell. An execution count such as [1] indicates that it has run. In the screenshot, the output shows Python 3.14.8 and the path to the Python interpreter in .venv:
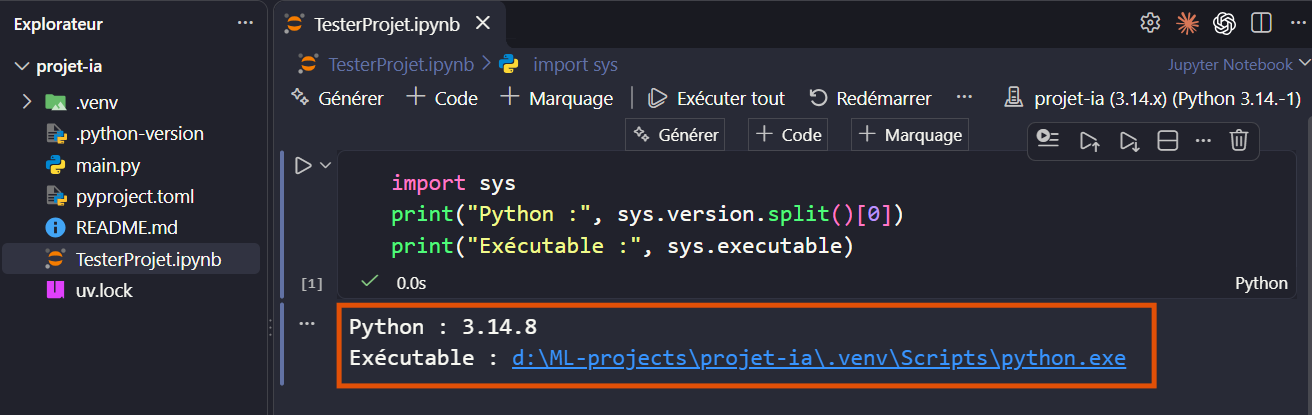
.venv.sys.version.split()[0] extracts Python’s version number. sys.executable shows the path of the Python interpreter actually started by the kernel, as explained in the Python documentation. The path shown on my computer is .venv\Scripts\python.exe.
Check the libraries in a second cell
Add a second Code cell with + Code, then enter and run:
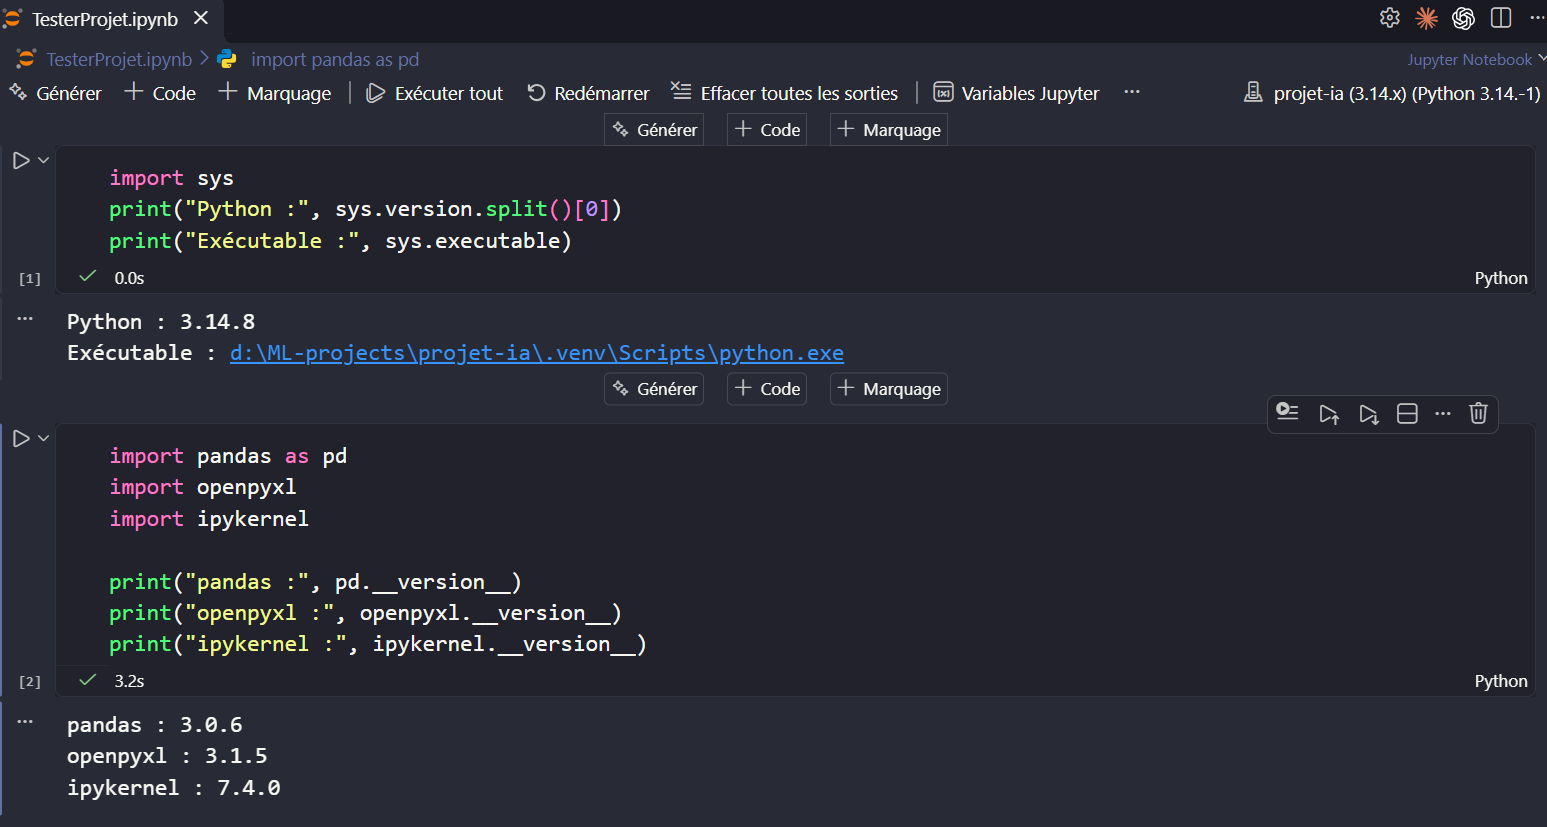
pandas, openpyxl and ipykernel.These versions were checked using a Python kernel started from the project’s .venv. import loads the libraries; pd is the short name assigned to pandas; the __version__ attribute displays their versions. If all three lines appear without an error, the notebook can access these packages. Versions may differ if you installed the dependencies later; uv sync --locked lets you restore those recorded in your lockfile.
7. Restart the kernel and run all cells
Repeat the checks with a fresh kernel
The kernel keeps variables in memory between cells. Click Restart Kernel, then Run All. Both cells in TesterProjet.ipynb should succeed in order: the first identifies the Python interpreter, and the second displays the library versions. Restarting clears the process’s variables without deleting .venv or its packages. Then save with Ctrl+S.
Outputs saved in a notebook may remain visible when it is reopened. Running the cells again checks the current configuration.
Find the project files
TesterProjet.ipynb is your working document; .venv provides the Python interpreter that executes its cells. pyproject.toml declares the requirements and uv.lock keeps the resolved versions. You now have the tools needed to continue the learning path.
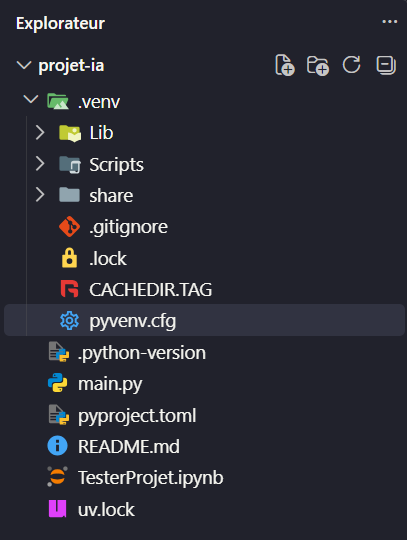
pyproject.toml and uv.lock; .venv contains the local environment.To check that you understand the structure, close and reopen VS Code in projet-ia. Open TesterProjet.ipynb, check its kernel and run both cells again. You should be able to distinguish pyproject.toml, uv.lock, .venv, the .ipynb file and the active kernel.
Resources for the next steps
To find a command again, start with uv projects and notebooks in VS Code. To understand the configuration files, see project structure and Python environments in VS Code.
